
在阿里云 ACK 上安装 KubeSphere
本指南将介绍如果在阿里云容器服务 ACK 上部署并使用 KubeSphere 3.0.0 平台。
阿里云 ACK 环境准备
创建 Kubernetes 集群
首先按使用环境的资源需求创建 Kubernetes 集群,满足以下一些条件即可(如已有环境并满足条件可跳过本节内容):
- KubeSphere 3.0.0 默认支持的 Kubernetes 版本为
1.15.x,1.16.x,1.17.x,1.18.x,选择支持的版本创建集群(如v1.16.9,v1.18.8); - 需要确保 Kubernetes 集群所使用的 ECS 实例的网络正常工作,可以通过在创建集群的同时自动创建或使用已有弹性 IP;或者在集群创建后自行配置网络(如配置 NAT 网关);
- 小规模场景下工作节点规格建议选择
4核|8GB配置,不推荐2核|4GB,并按需扩展工作节点数量(通常生产环境需要 3 个及以上工作节点),详情可参考最佳实践- ECS 选型。
1.创建标准托管集群,转到导航菜单,然后参考下图创建集群,您可以使用集群模板快速创建标准托管集群:
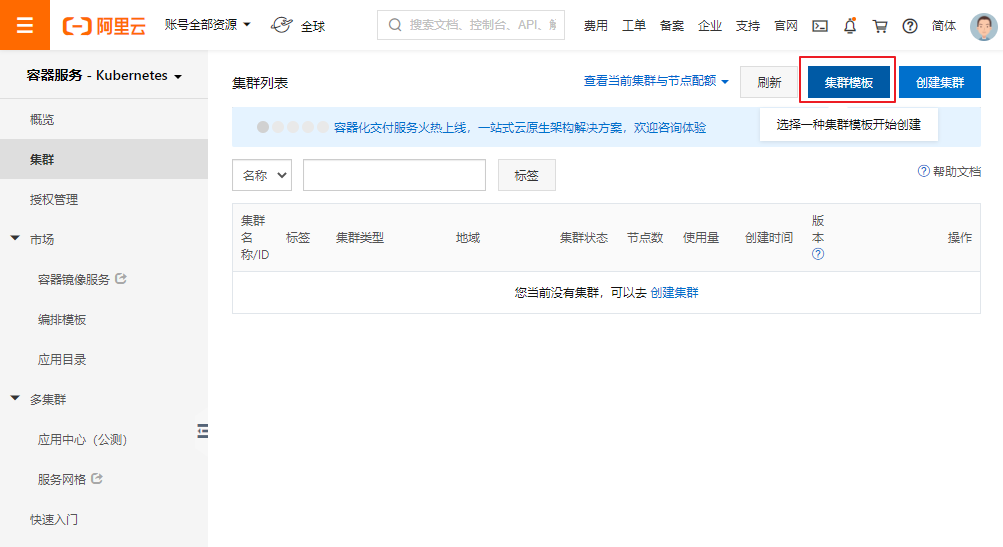
选择标准托管集群
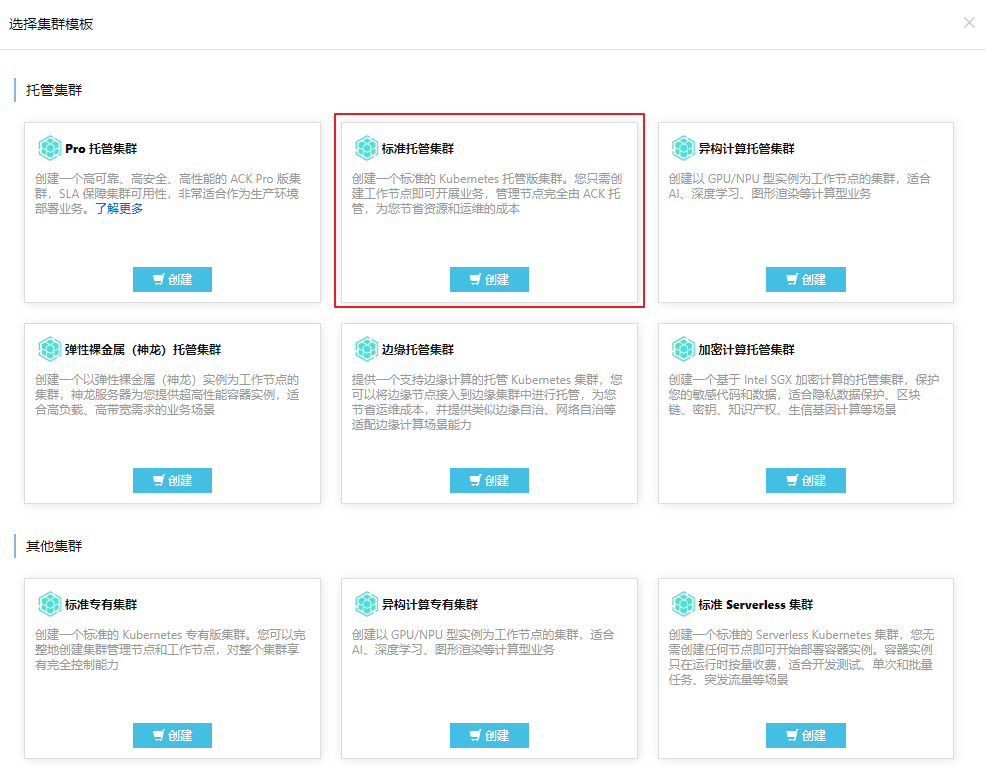
2.在配置集群页面,配置以下集群信息:
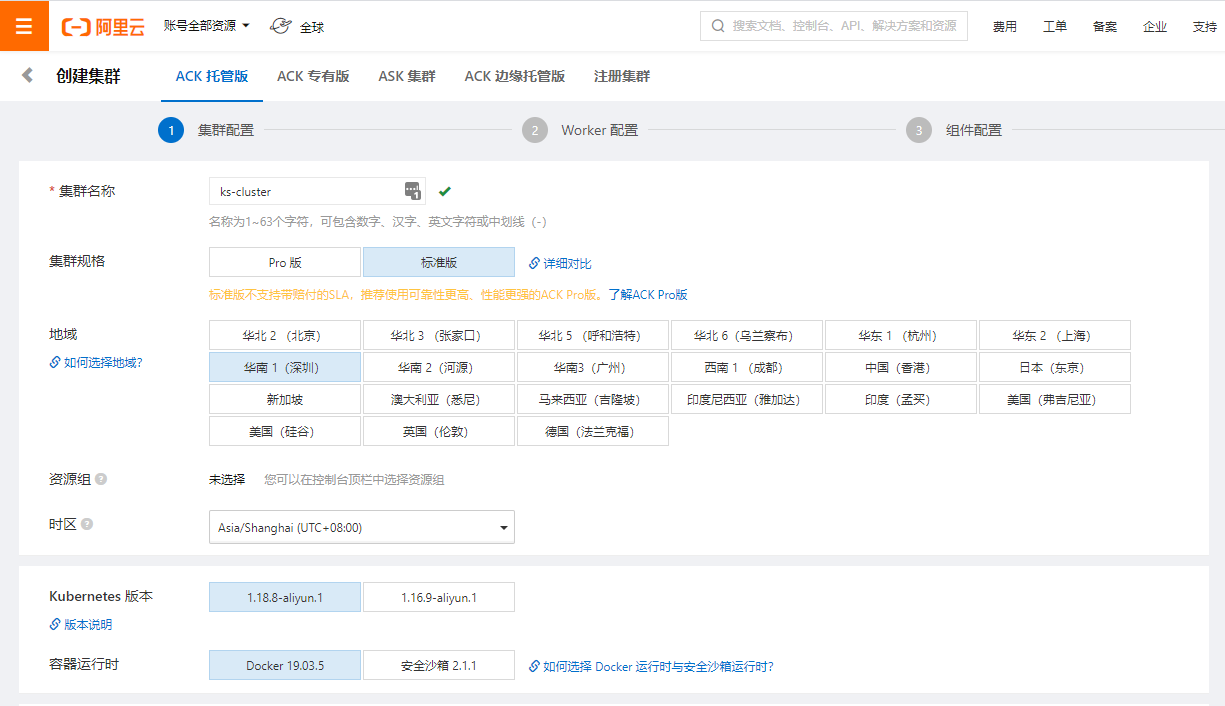
说明:配置集群名称、选择 Kubernetes版本、容器运行时版本等。
3.指定专有网络,勾选为专有网络配置 SNAT 以及使用 EIP 暴露 API Server:
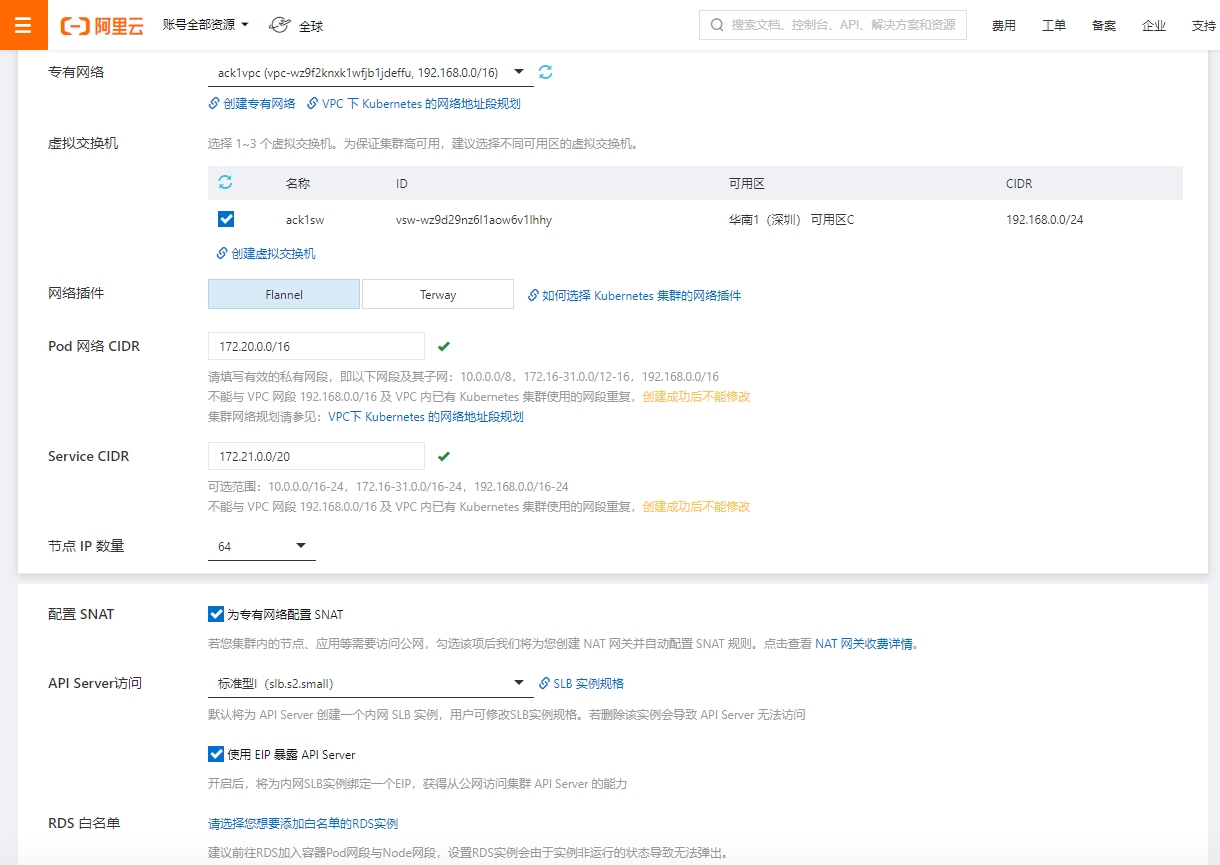
4.配置 Worker 实例规格
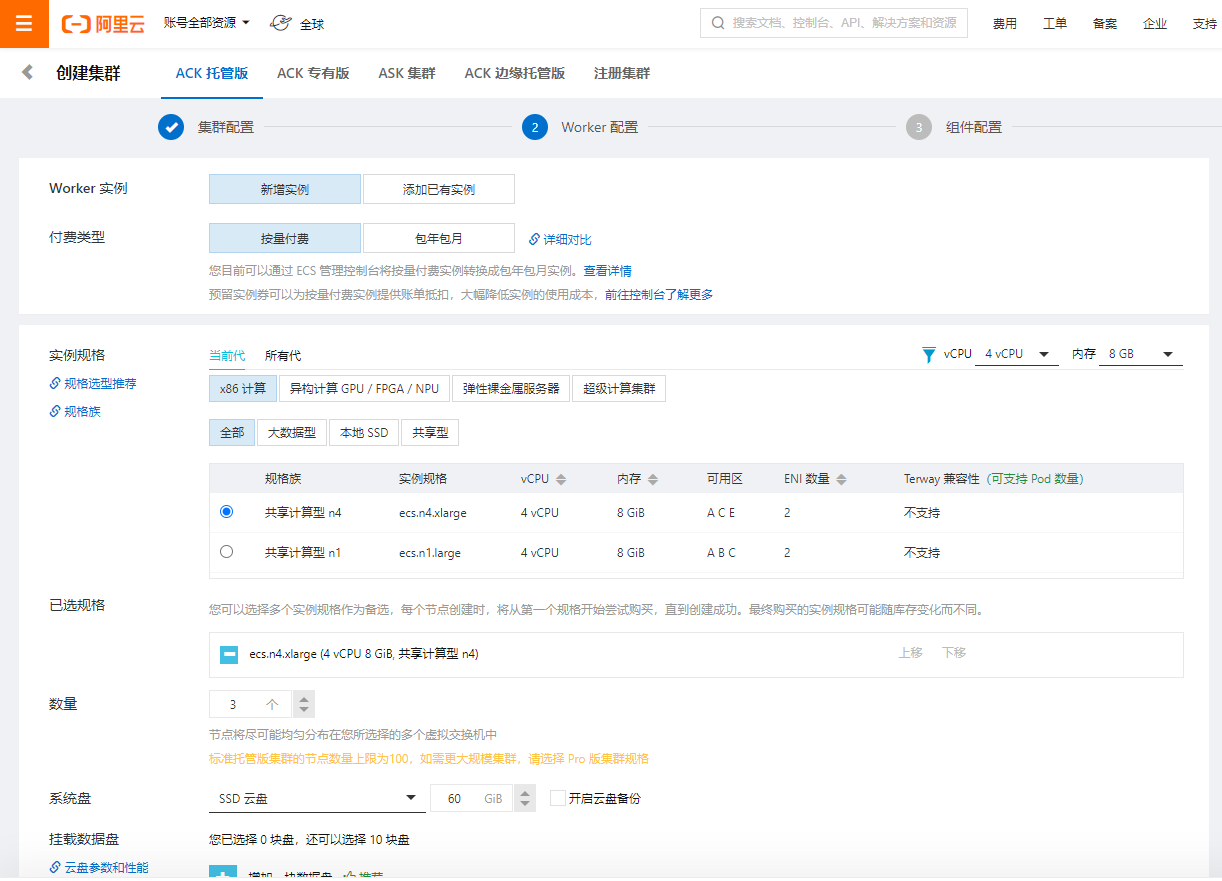
指定实例操作系统类型,并为实例配置密码或秘钥

5.选择安装相关组件,完成后创建集群
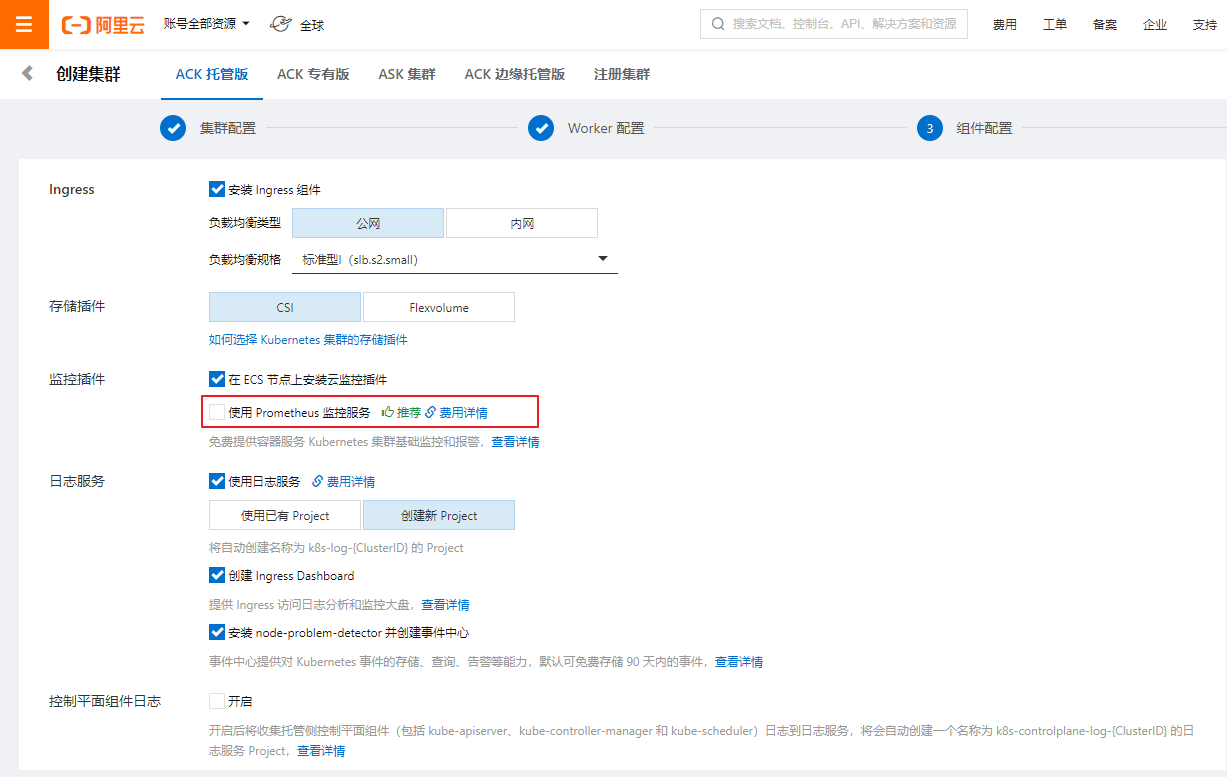
警告
6.等待集群创建完成,点击详情,查看集群信息

连接到 ACK 集群
-
创建完集群后,点击集群信息 > 连接信息界面,选择公网访问,复制下方 kubeconfig 信息到本地计算机,即可在本地连接到 ack 集群。
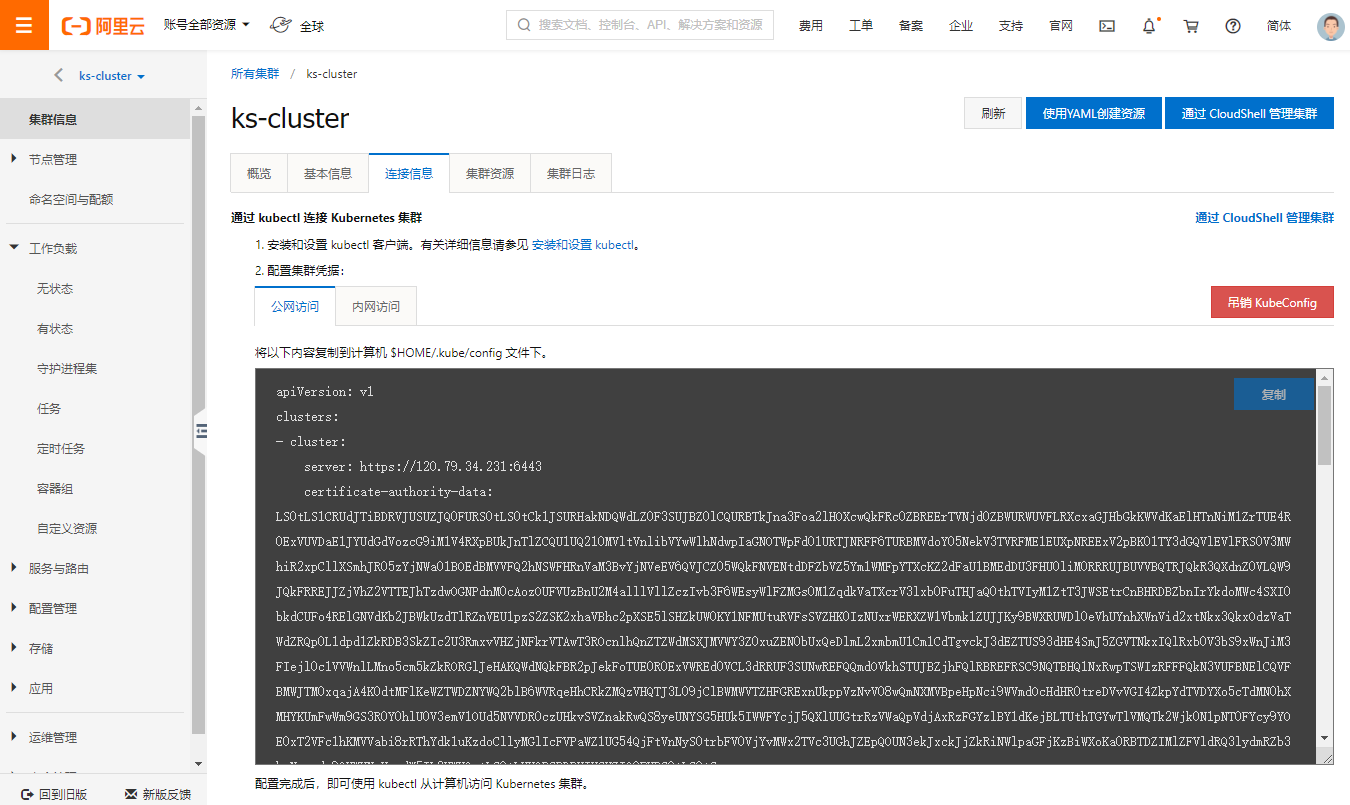
也可以通过连接 CloudShell 管理集群,点击通过 CloudShell 管理集群,执行以下命令查看集群节点信息:
shell@Alicloud:~$ kubectl get nodes -o wide
NAME                       STATUS   ROLES    AGE   VERSION            INTERNAL-IP    EXTERNAL-IP   OS-IMAGE                KERNEL-VERSION                CONTAINER-RUNTIME
cn-shenzhen.192.168.0.35   Ready    <none>   15m   v1.18.8-aliyun.1   192.168.0.35   <none>        CentOS Linux 7 (Core)   3.10.0-1127.19.1.el7.x86_64   docker://19.3.5
cn-shenzhen.192.168.0.36   Ready    <none>   15m   v1.18.8-aliyun.1   192.168.0.36   <none>        CentOS Linux 7 (Core)   3.10.0-1127.19.1.el7.x86_64   docker://19.3.5
cn-shenzhen.192.168.0.37   Ready    <none>   15m   v1.18.8-aliyun.1   192.168.0.37   <none>        CentOS Linux 7 (Core)   3.10.0-1127.19.1.el7.x86_64   docker://19.3.5
部署 KubeSphere
查看 StorageClass
备注
您可以在阿里云容器服务 Kubernetes 集群中使用阿里云云盘存储卷。目前,阿里云 CSI 插件支持通过 PV/PVC 方式挂载云盘,包括静态存储卷和动态存储卷。
默认阿里云 ACK 已经为用户创建了不同规格的 StorageClass,可直接使用,但存在最小容量规格限制,详情参考云盘存储卷使用说明。
连接到 cloudshell 查看 StorageClass 类型
shell@Alicloud:~$ kubectl get sc
NAME                       PROVISIONER                       RECLAIMPOLICY   VOLUMEBINDINGMODE      ALLOWVOLUMEEXPANSION   AGE
alicloud-disk-available    diskplugin.csi.alibabacloud.com   Delete          Immediate              true                   14m
alicloud-disk-efficiency   diskplugin.csi.alibabacloud.com   Delete          Immediate              true                   14m
alicloud-disk-essd         diskplugin.csi.alibabacloud.com   Delete          Immediate              true                   14m
alicloud-disk-ssd          diskplugin.csi.alibabacloud.com   Delete          Immediate              true                   14m
alicloud-disk-topology     diskplugin.csi.alibabacloud.com   Delete          WaitForFirstConsumer   true                   14m
容器服务Kubernetes版(ACK)集群默认提供了以下几种StorageClass:
- alicloud-disk-efficiency:高效云盘。
- alicloud-disk-ssd:SSD云盘。
- alicloud-disk-essd:ESSD云盘。
- alicloud-disk-available:提供高可用选项,优先创建SSD云盘;如果SSD云盘售尽,则创建高效云盘。
- alicloud-disk-topology: 使用延迟绑定的方式创建云盘。
指定默认StorageClass
本次使用alicloud-disk-efficiency,注意申请高效云盘时申请的PV大小不得小于20G。
kubectl patch sc alicloud-disk-efficiency -p '{"metadata": {"annotations": {"storageclass.beta.kubernetes.io/is-default-class": "true"}}}'
确认配置成功
shell@Alicloud:~$ kubectl get sc
NAME                                 PROVISIONER                       RECLAIMPOLICY   VOLUMEBINDINGMODE      ALLOWVOLUMEEXPANSION   AGE
alicloud-disk-available              diskplugin.csi.alibabacloud.com   Delete          Immediate              true                   30m
alicloud-disk-efficiency (default)   diskplugin.csi.alibabacloud.com   Delete          Immediate              true                   30m
alicloud-disk-essd                   diskplugin.csi.alibabacloud.com   Delete          Immediate              true                   30m
alicloud-disk-ssd                    diskplugin.csi.alibabacloud.com   Delete          Immediate              true                   30m
alicloud-disk-topology               diskplugin.csi.alibabacloud.com   Delete          WaitForFirstConsumer   true                   30m
最小化部署kubesphere
1.使用 ks-installer 在已有的 Kubernetes 集群上来部署 KubeSphere,下载 YAML 文件:
wget https://github.com/kubesphere/ks-installer/releases/download/v3.1.1/kubesphere-installer.yaml
wget https://github.com/kubesphere/ks-installer/releases/download/v3.1.1/cluster-configuration.yaml
警告
部分存储卷 VolumeSize 小于20G,需要手动调整:
shell@Alicloud:~$ cat cluster-configuration.yaml | grep Volum
    mysqlVolumeSize: 20Gi # MySQL PVC size.
    minioVolumeSize: 20Gi # Minio PVC size.
    etcdVolumeSize: 20Gi  # etcd PVC size.
    openldapVolumeSize: 2Gi   # openldap PVC size.
    redisVolumSize: 2Gi # Redis PVC size.
      elasticsearchMasterVolumeSize: 4Gi   # Volume size of Elasticsearch master nodes.
      elasticsearchDataVolumeSize: 20Gi    # Volume size of Elasticsearch data nodes.
    jenkinsVolumeSize: 8Gi     # Jenkins volume size.
    prometheusVolumeSize: 20Gi       # Prometheus PVC size.
编辑 cluster-configuration.yaml 文件,调整 openldapVolumeSize、redisVolumSize、elasticsearchMasterVolumeSize、jenkinsVolumeSize 4 个卷大小为 20G。
执行以下命令部署 kubesphere:
kubectl apply -f kubesphere-installer.yaml
kubectl apply -f cluster-configuration.yaml
2.检查安装日志:
kubectl logs -n kubesphere-system $(kubectl get pod -n kubesphere-system -l app=ks-install -o jsonpath='{.items[0].metadata.name}') -f
3.安装完成后,您会看到以下消息:
#####################################################
###              Welcome to KubeSphere!           ###
#####################################################
Account: admin
Password: P@88w0rd
NOTES:
  1. After logging into the console, please check the
    monitoring status of service components in
    the "Cluster Management". If any service is not
    ready, please wait patiently until all components
    are ready.
  2. Please modify the default password after login.
#####################################################
https://kubesphere.io             2020-xx-xx xx:xx:xx
访问 KubeSphere 控制台
现在已经安装了 KubeSphere,您可以按照以下步骤访问 KubeSphere 的 Web 控制台。
-
切换到 kubesphere-system 命名空间,选择服务,选择 ks-console 点击更新
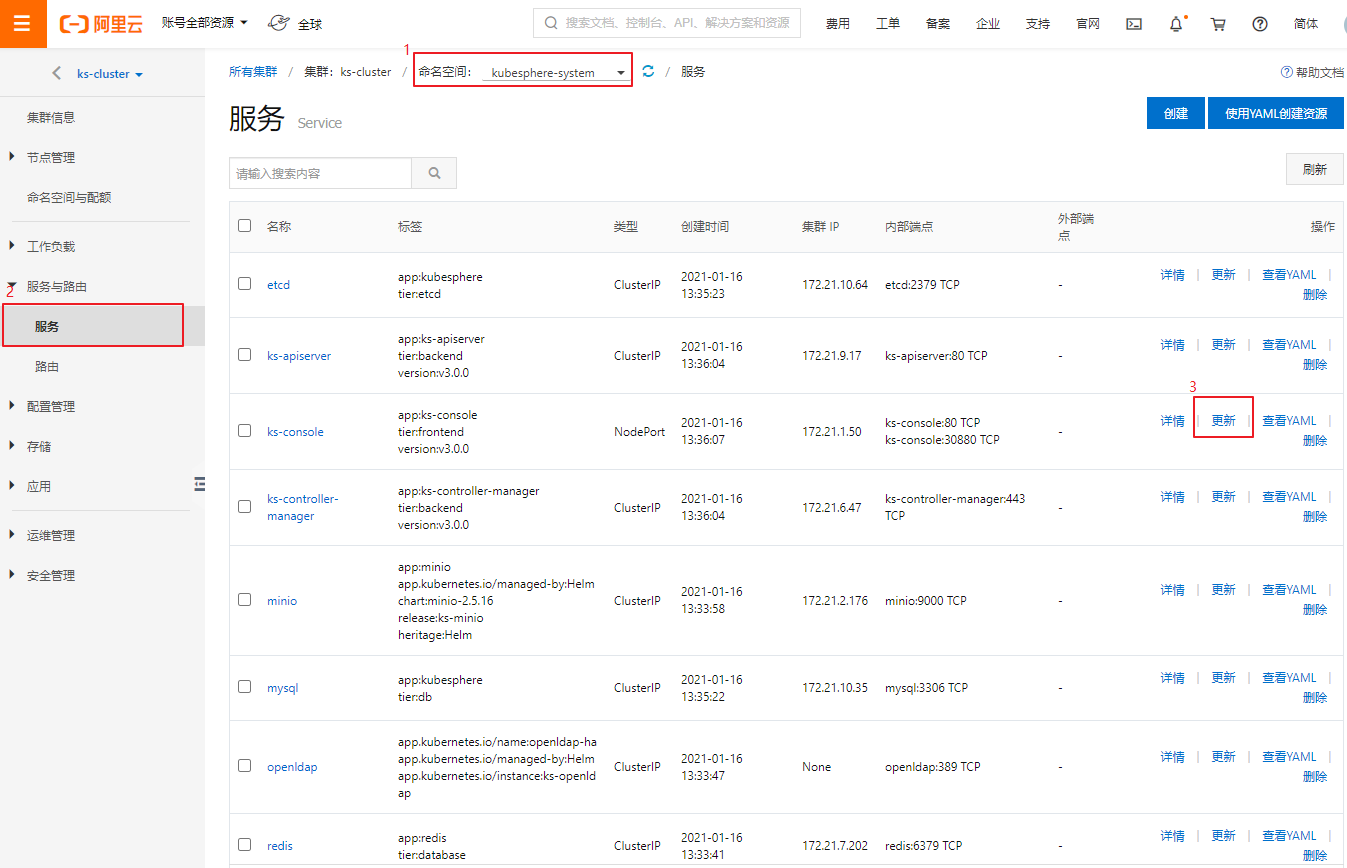
-
将 service 类型
NodePort更改为LoadBalancer,完成后点击更新。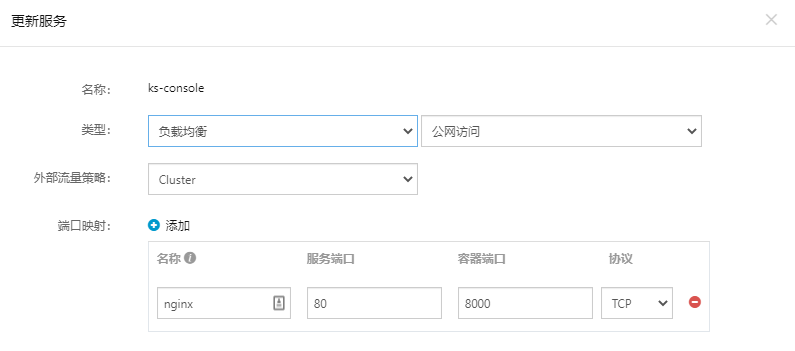
-
获取您的 EXTERNAL-IP。
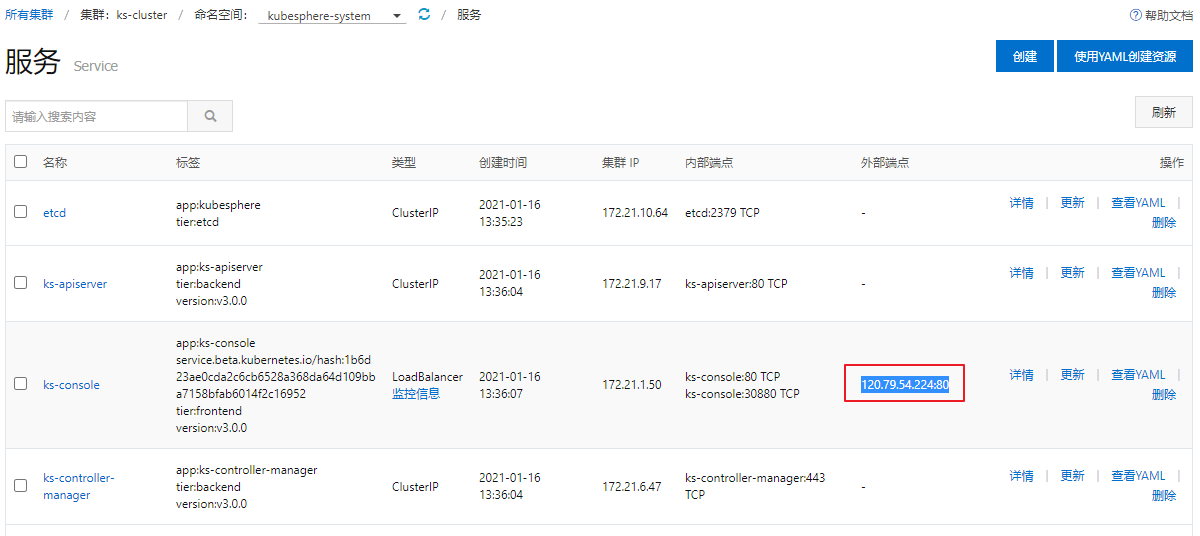
-
使用 ACK 生成的 external-ip 访问 KubeSphere 的 Web 控制台, 默认帐户和密码(
admin/P@88w0rd),在集群概述页面中,可以看到如下图所示的仪表板。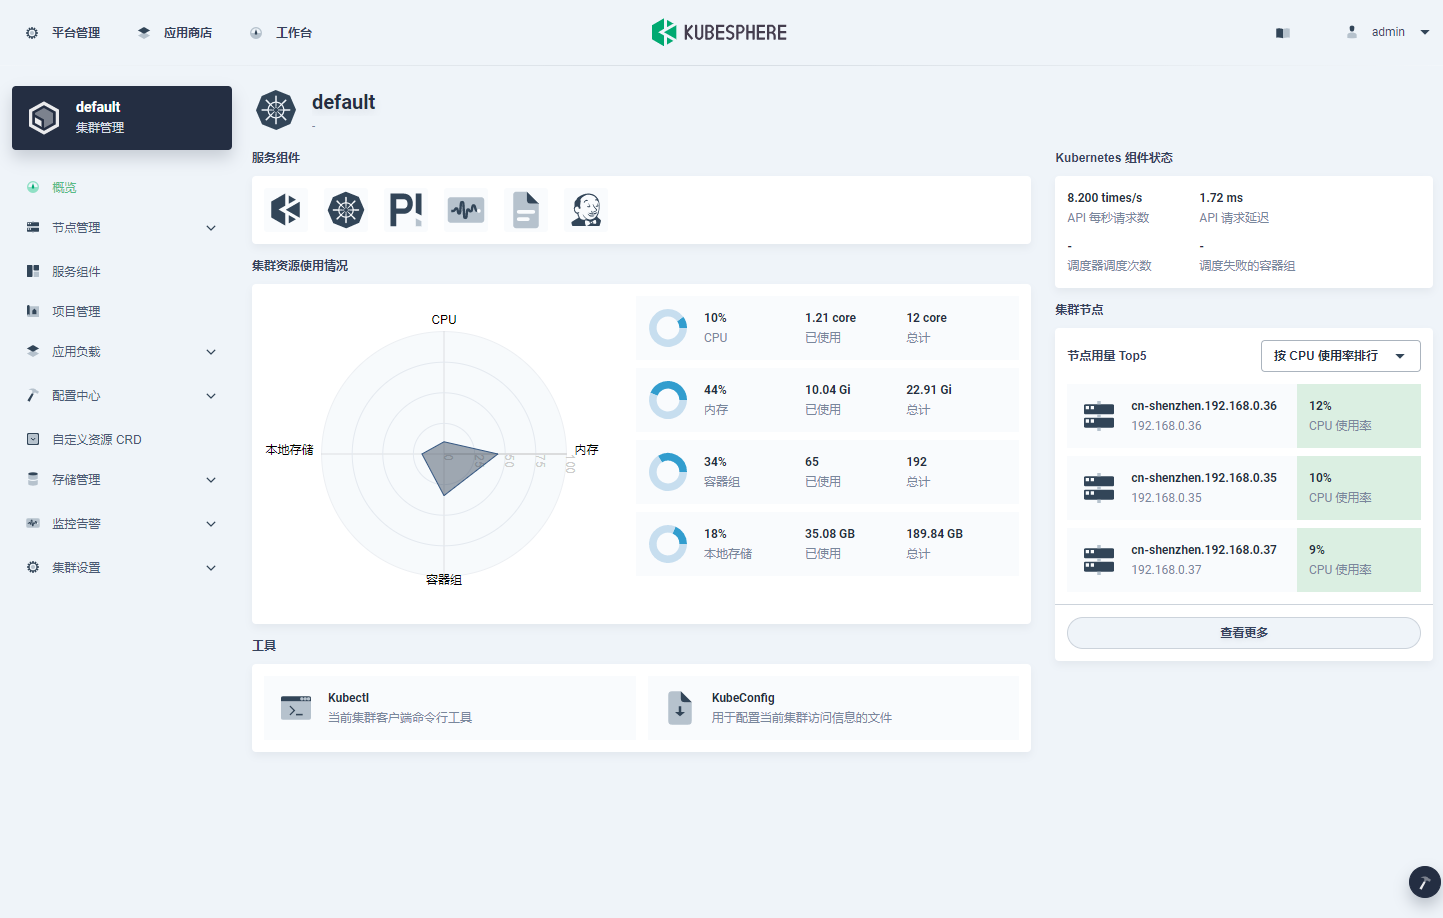
启用可插拔组件(可选)
上面的示例演示了默认的最小安装过程,要在 KubeSphere 中启用其他组件,请参阅启用可插拔组件。
警告
反馈
这篇文章对您有帮助吗?
感谢您的反馈。如果您有关于如何使用 KubeSphere 的具体问题,请在 Slack 上提问。如果您想报告问题或提出改进建议,请在 GitHub 存储库中打开问题。


 上一篇
上一篇
