


Create Workspaces, Projects, Accounts and Roles
This quickstart demonstrates how to create workspaces, roles and user accounts which are required for other tutorials. Meanwhile, you will learn how to create projects and DevOps projects within your workspace where your workloads are running. After this tutorial, you will become familiar with the multi-tenant management system of KubeSphere.
Prerequisites
KubeSphere needs to be installed in your machine.
Architecture
The multi-tenant system of KubeSphere features three levels of hierarchical structure which are cluster, workspace, and project. A project in KubeSphere is a Kubernetes namespace.
You are required to create a new workspace to work with instead of using the system workspace where system resources are running and most of them are viewable only. In addition, it is strongly recommended different tenants work with corresponding roles in a workspace for security considerations.
You can create multiple workspaces within a KubeSphere cluster. Under each workspace, you can also create multiple projects. Each level has multiple built-in roles. Besides, KubeSphere allows you to create roles with customized authorization as well. The KubeSphere hierarchy is applicable for enterprise users with different teams or groups, and different roles within each team.
Hands-on Lab
Step 1: Create an account
After KubeSphere is installed, you need to add different users with varied roles to the platform so that they can work at different levels on various resources. Initially, you only have one default account, which is admin, granted the role platform-admin. In the first step, you create an account user-manager and further create more accounts as user-manager.
-
Log in to the web console as
adminwith the default account and password (admin/P@88w0rd).Tip
For account security, it is highly recommended that you change your password the first time you log in to the console. To change your password, select User Settings in the drop-down list in the upper-right corner. In Password Settings, set a new password. You also can change the console language in User Settings. -
Click Platform in the upper-left corner, and then select Access Control. In the left nevigation pane, select Account Roles. There are four built-in roles as shown in the following table.
Built-in Roles Description workspaces-managerWorkspace manager who can manage all workspaces on the platform. users-managerUser manager who can manage all users on the platform. platform-regularRegular user who has no access to any resources before joining a workspace or cluster. platform-adminAdministrator who can manage all resources on the platform. Note
Built-in roles are created automatically by KubeSphere and cannot be edited or deleted. -
In Accounts, click Create. In the displayed dialog box, provide all the necessary information (marked with *) and select
users-managerfor Role. Refer to the following image as an example.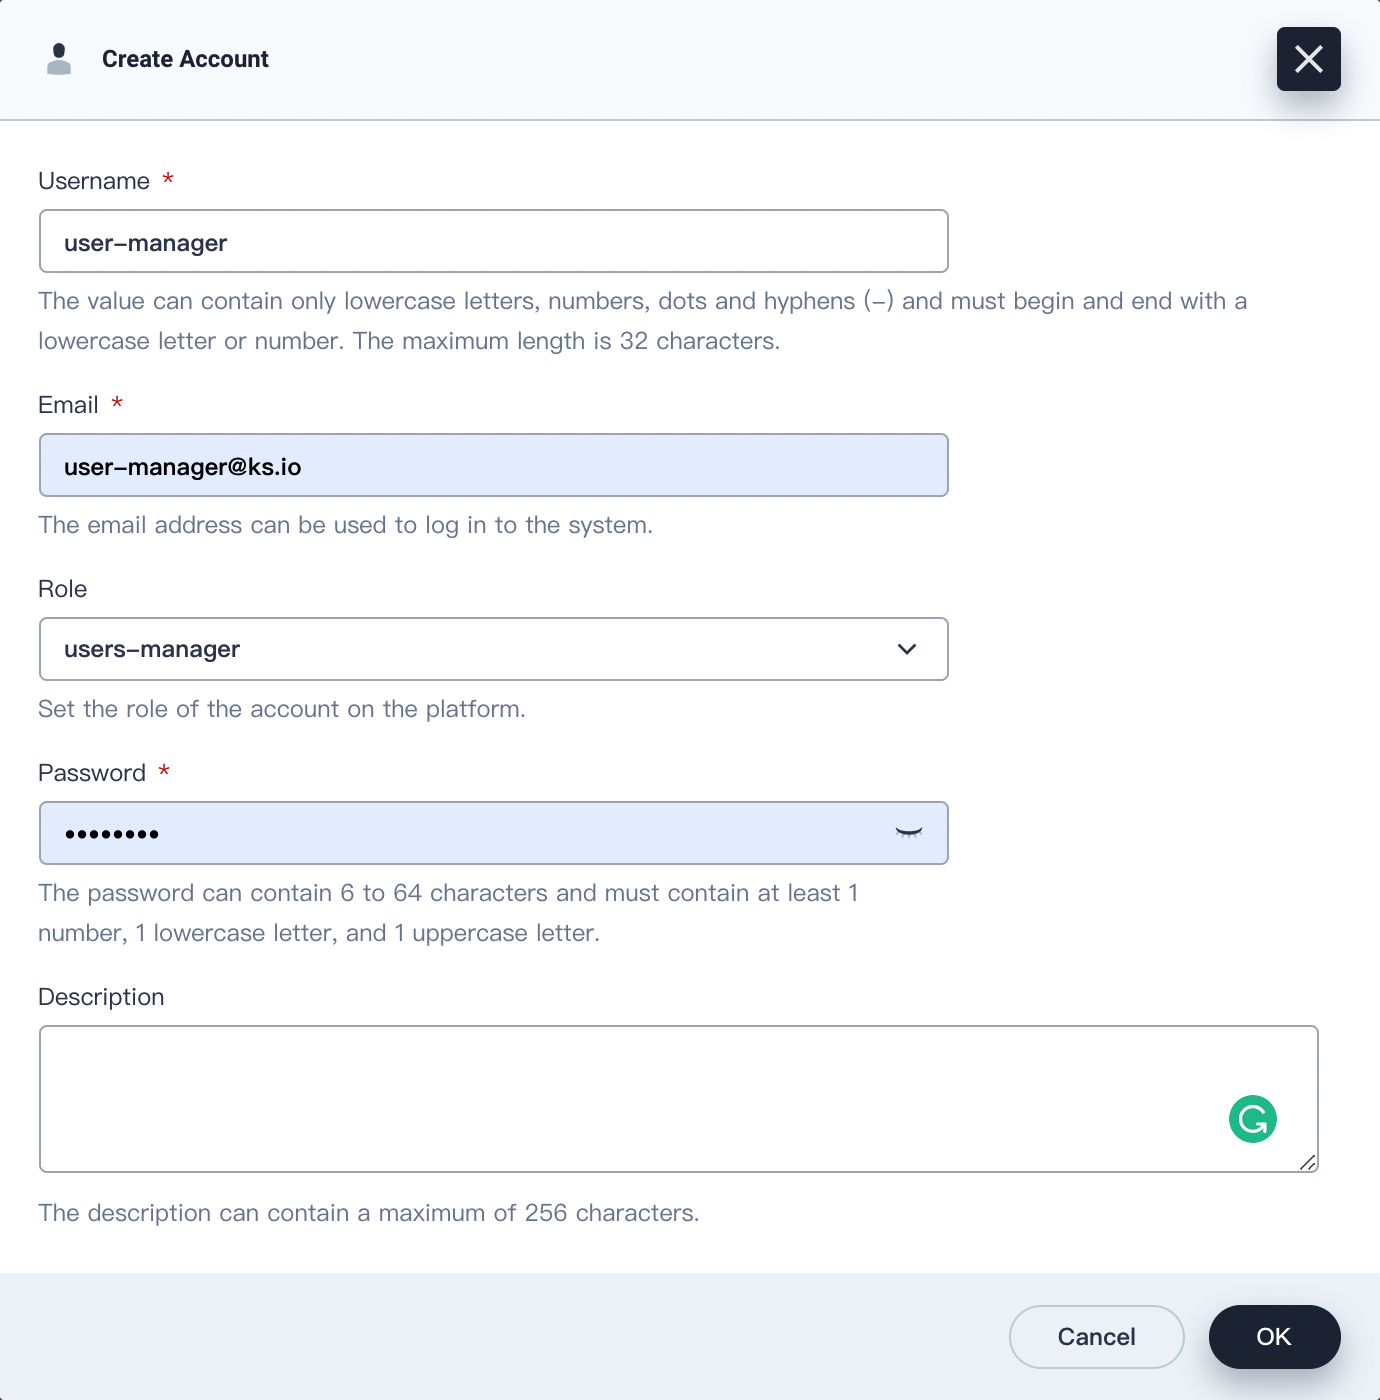
Click OK after you finish. The new account will display on the Accounts page.
-
Log out of the console and log back in with the account
user-managerto create four accounts that will be used in other tutorials.Tip
To log out, click your username in the upper-right corner and select Log Out.Account Role Description ws-managerworkspaces-managerCreate and manage all workspaces. ws-adminplatform-regularManage all resources in a specified workspace (This account is used to invite new members to a workspace in this example). project-adminplatform-regularCreate and manage projects and DevOps projects, and invite new members into the projects. project-regularplatform-regularproject-regularwill be invited to a project or DevOps project byproject-admin. This account will be used to create workloads, pipelines and other resources in a specified project. -
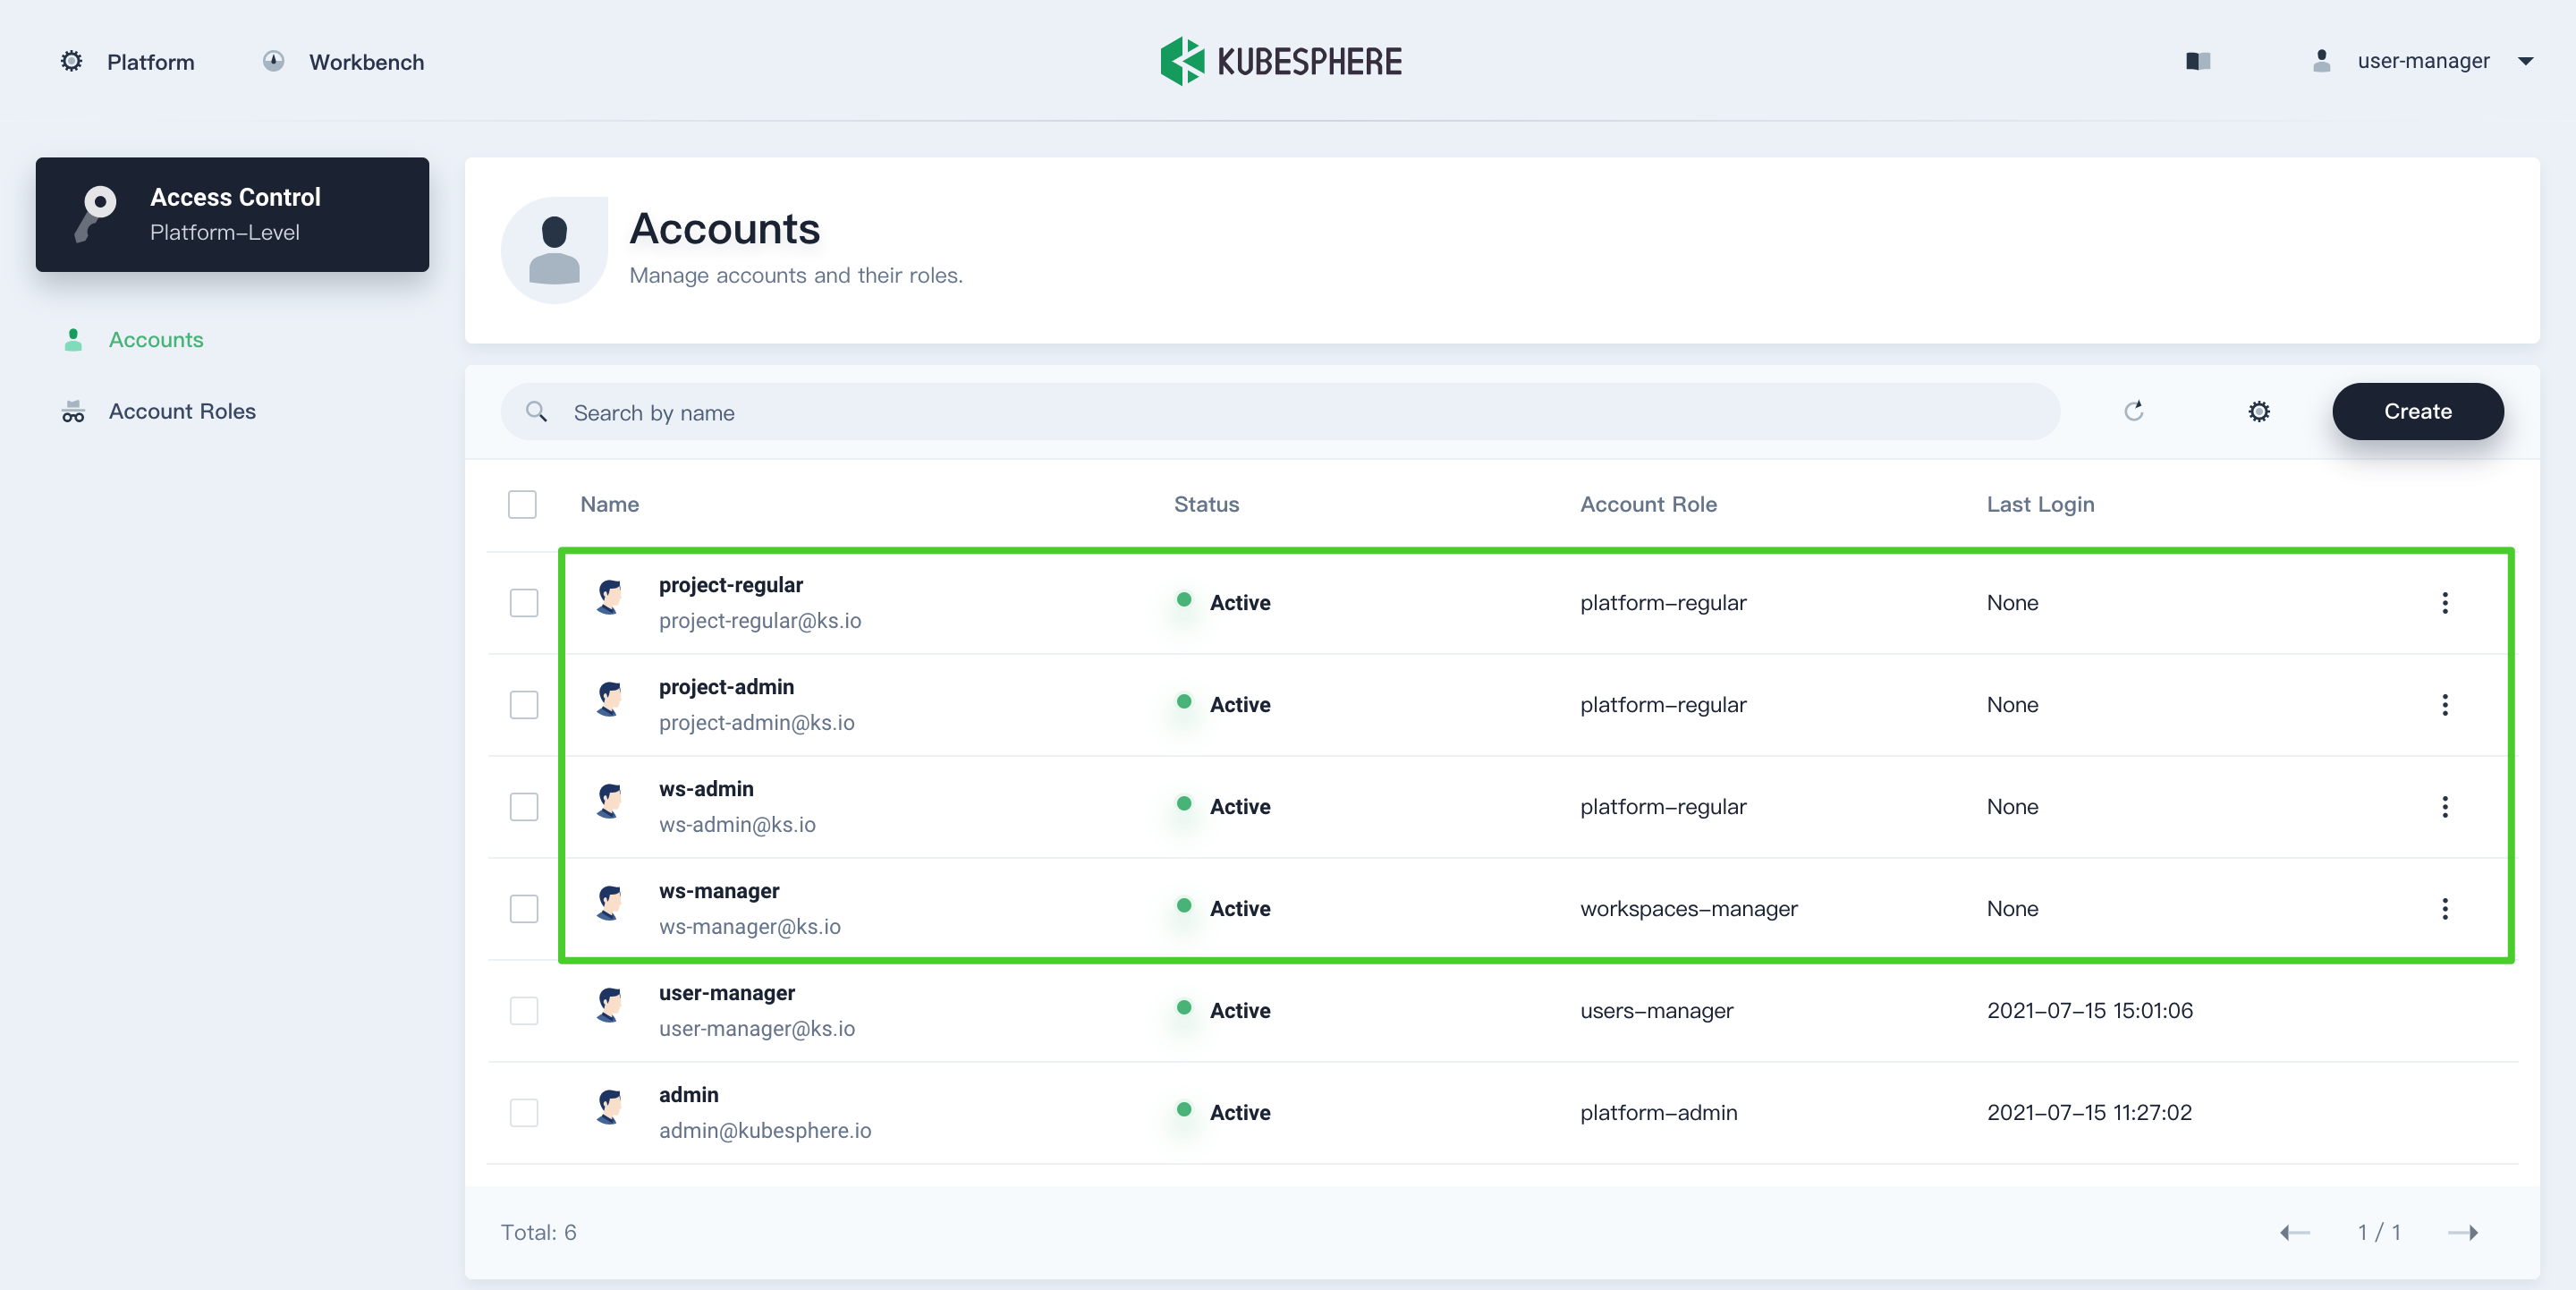
Verify the four accounts created.
Step 2: Create a workspace
In this step, you create a workspace using the account ws-manager created in the previous step. As the basic logic unit for the management of projects, DevOps projects and organization members, workspaces underpin the multi-tenant system of KubeSphere.
-
Log in to KubeSphere as
ws-managerwhich has the permission to manage all workspaces on the platform. Click Platform in the upper-left corner and select Access Control. In Workspaces, you can see there is only one default workspacesystem-workspace, where system-related components and services run. You are not allowed to delete this workspace. -
Click Create on the right, set a name for the new workspace (for example,
demo-workspace) and set the userws-adminas the workspace manager. Click Create after you finish.Note
If you have enabled the multi-cluster feature, you need to assign an available cluster (or multiple clusters) to the workspace so that projects can be created on the cluster(s) later. -
Log out of the console and log back in as
ws-admin. In Workspace Settings, select Workspace Members and click Invite Member. -
Invite both
project-adminandproject-regularto the workspace. Assign them the roleworkspace-self-provisionerandworkspace-viewerrespectively and click OK.Note
The actual role name follows a naming convention:<workspace name>-<role name>. For example, in this workspace nameddemo-workspace, the actual role name of the roleviewerisdemo-workspace-viewer.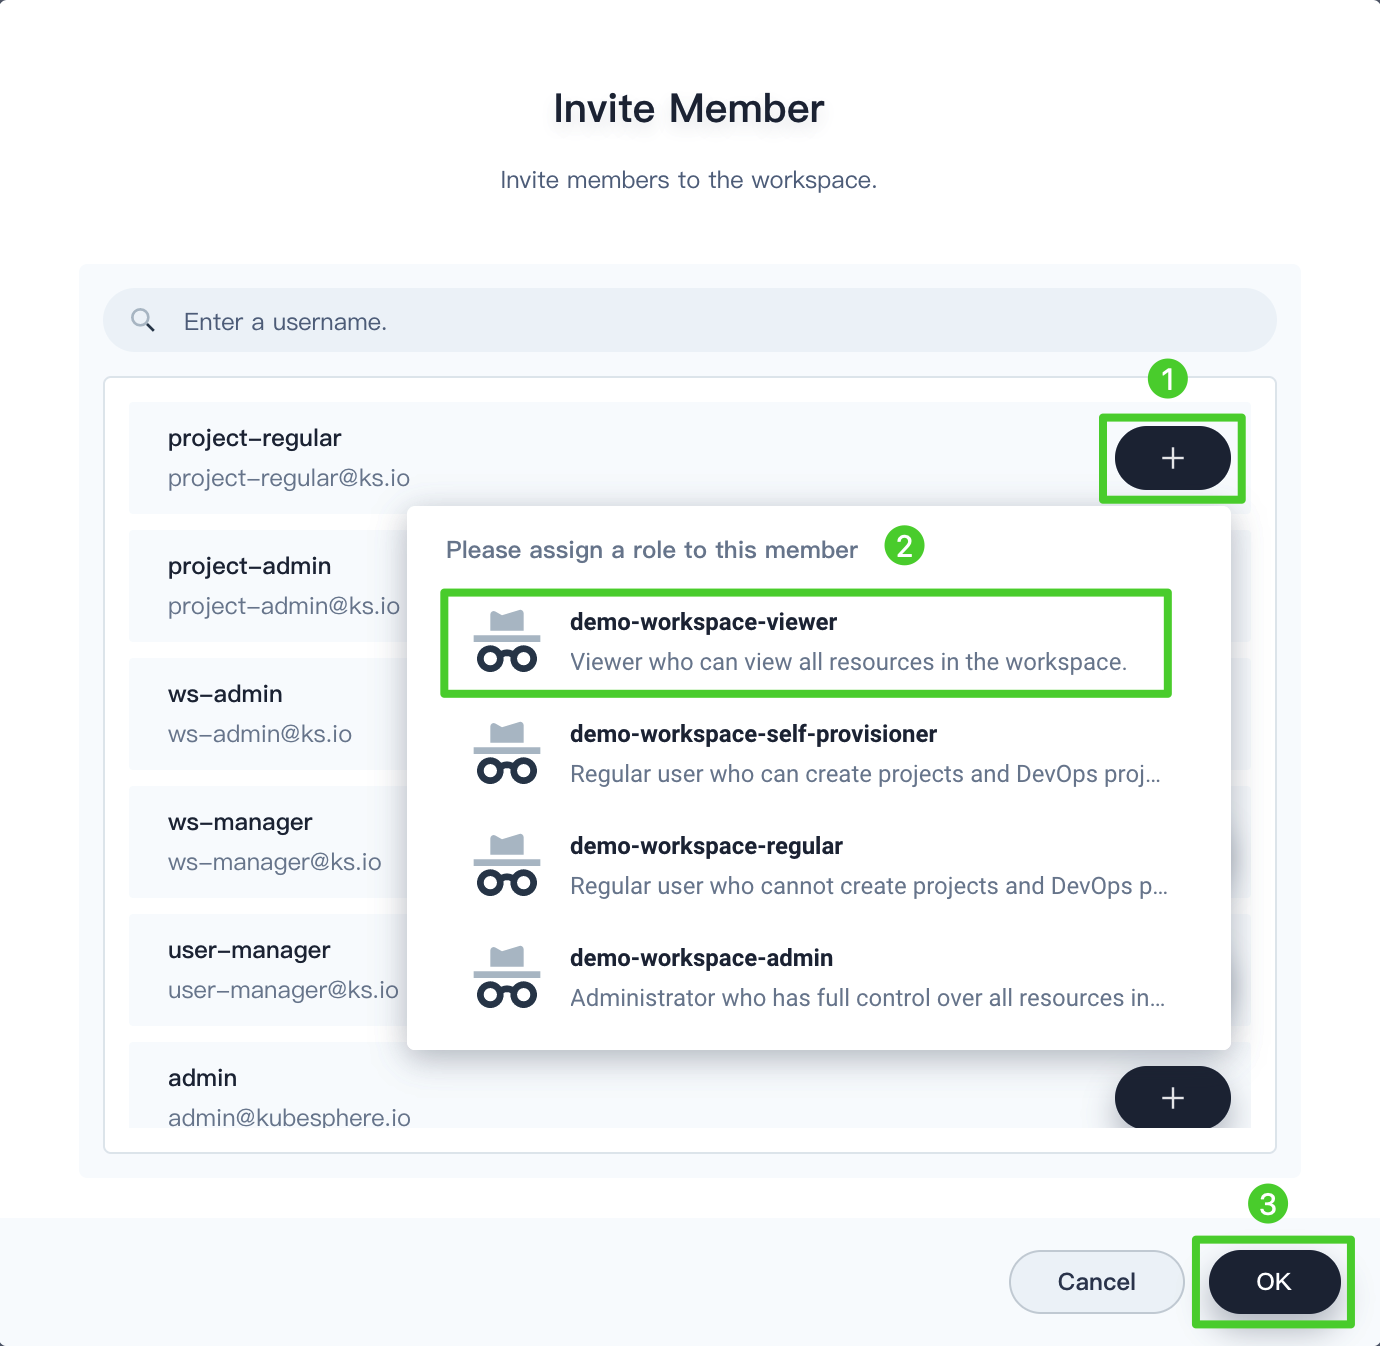
-
In Workspace Members, you can see three members listed.
Account Role Description ws-adminworkspace-adminManage all resources under the workspace (use this account to invite new members to the workspace). project-adminworkspace-self-provisionerCreate and manage projects and DevOps projects, and invite new members to join the projects. project-regularworkspace-viewerproject-regularwill be invited byproject-adminto join a project or DevOps project. The account can be used to create workloads, pipelines, etc.
Step 3: Create a project
In this step, you create a project using the account project-admin created in the previous step. A project in KubeSphere is the same as a namespace in Kubernetes, which provides virtual isolation for resources. For more information, see Namespaces.
-
Log in to the KubeSphere web console as
project-admin. In Projects, click Create. -
Enter the project name (for example,
demo-project) and click OK to finish. You can also add an alias and description for the project. -
In Projects, click the project name to view its details page.
-
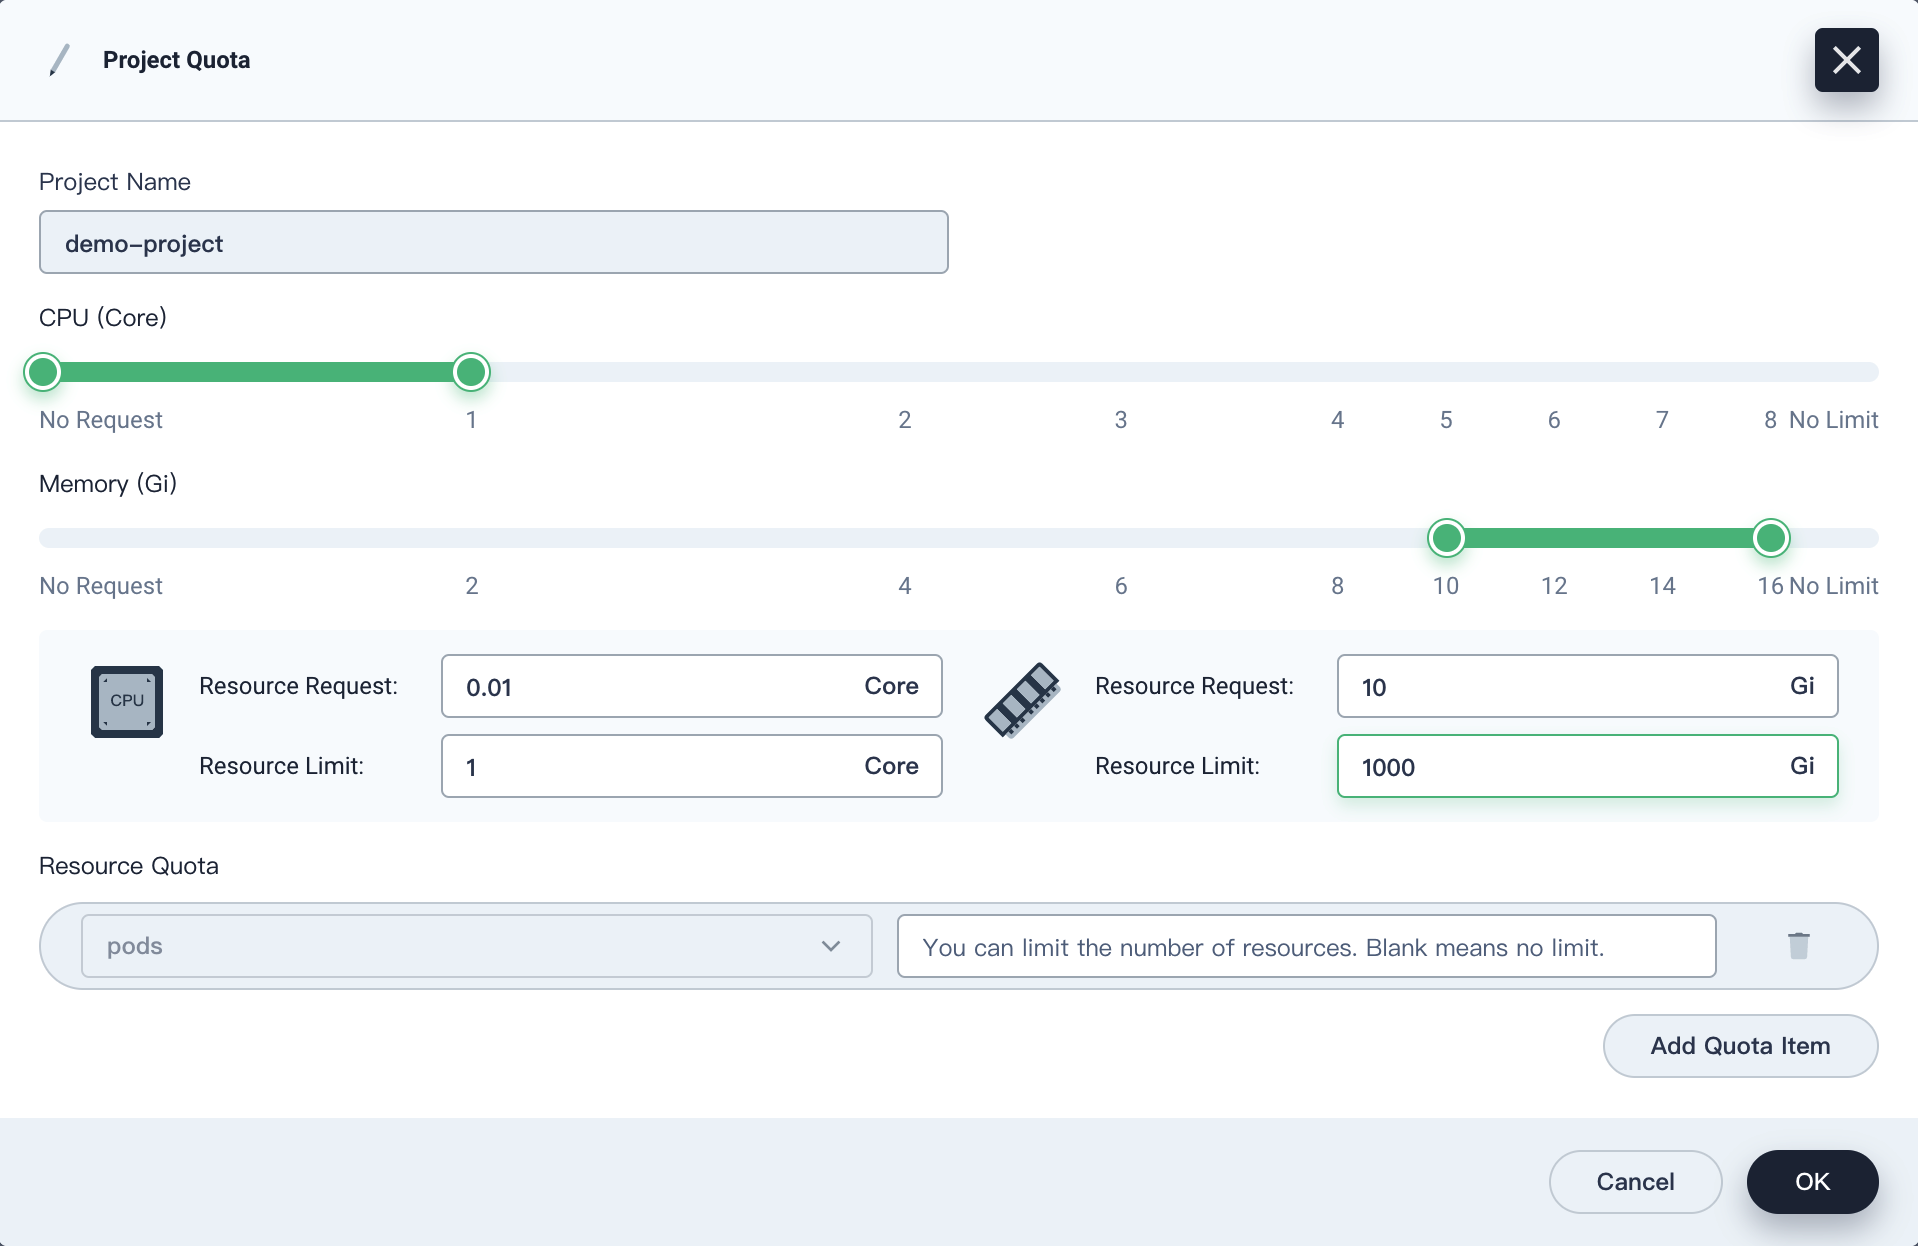
On the Overview page of the project, the project quota remains unset by default. You can click Set and specify resource requests and limits as needed (for example, 1 Core for CPU and 1000 Gi for memory).
-
Invite
project-regularto this project and grant this user the roleoperator. Refer to the following image for specific steps.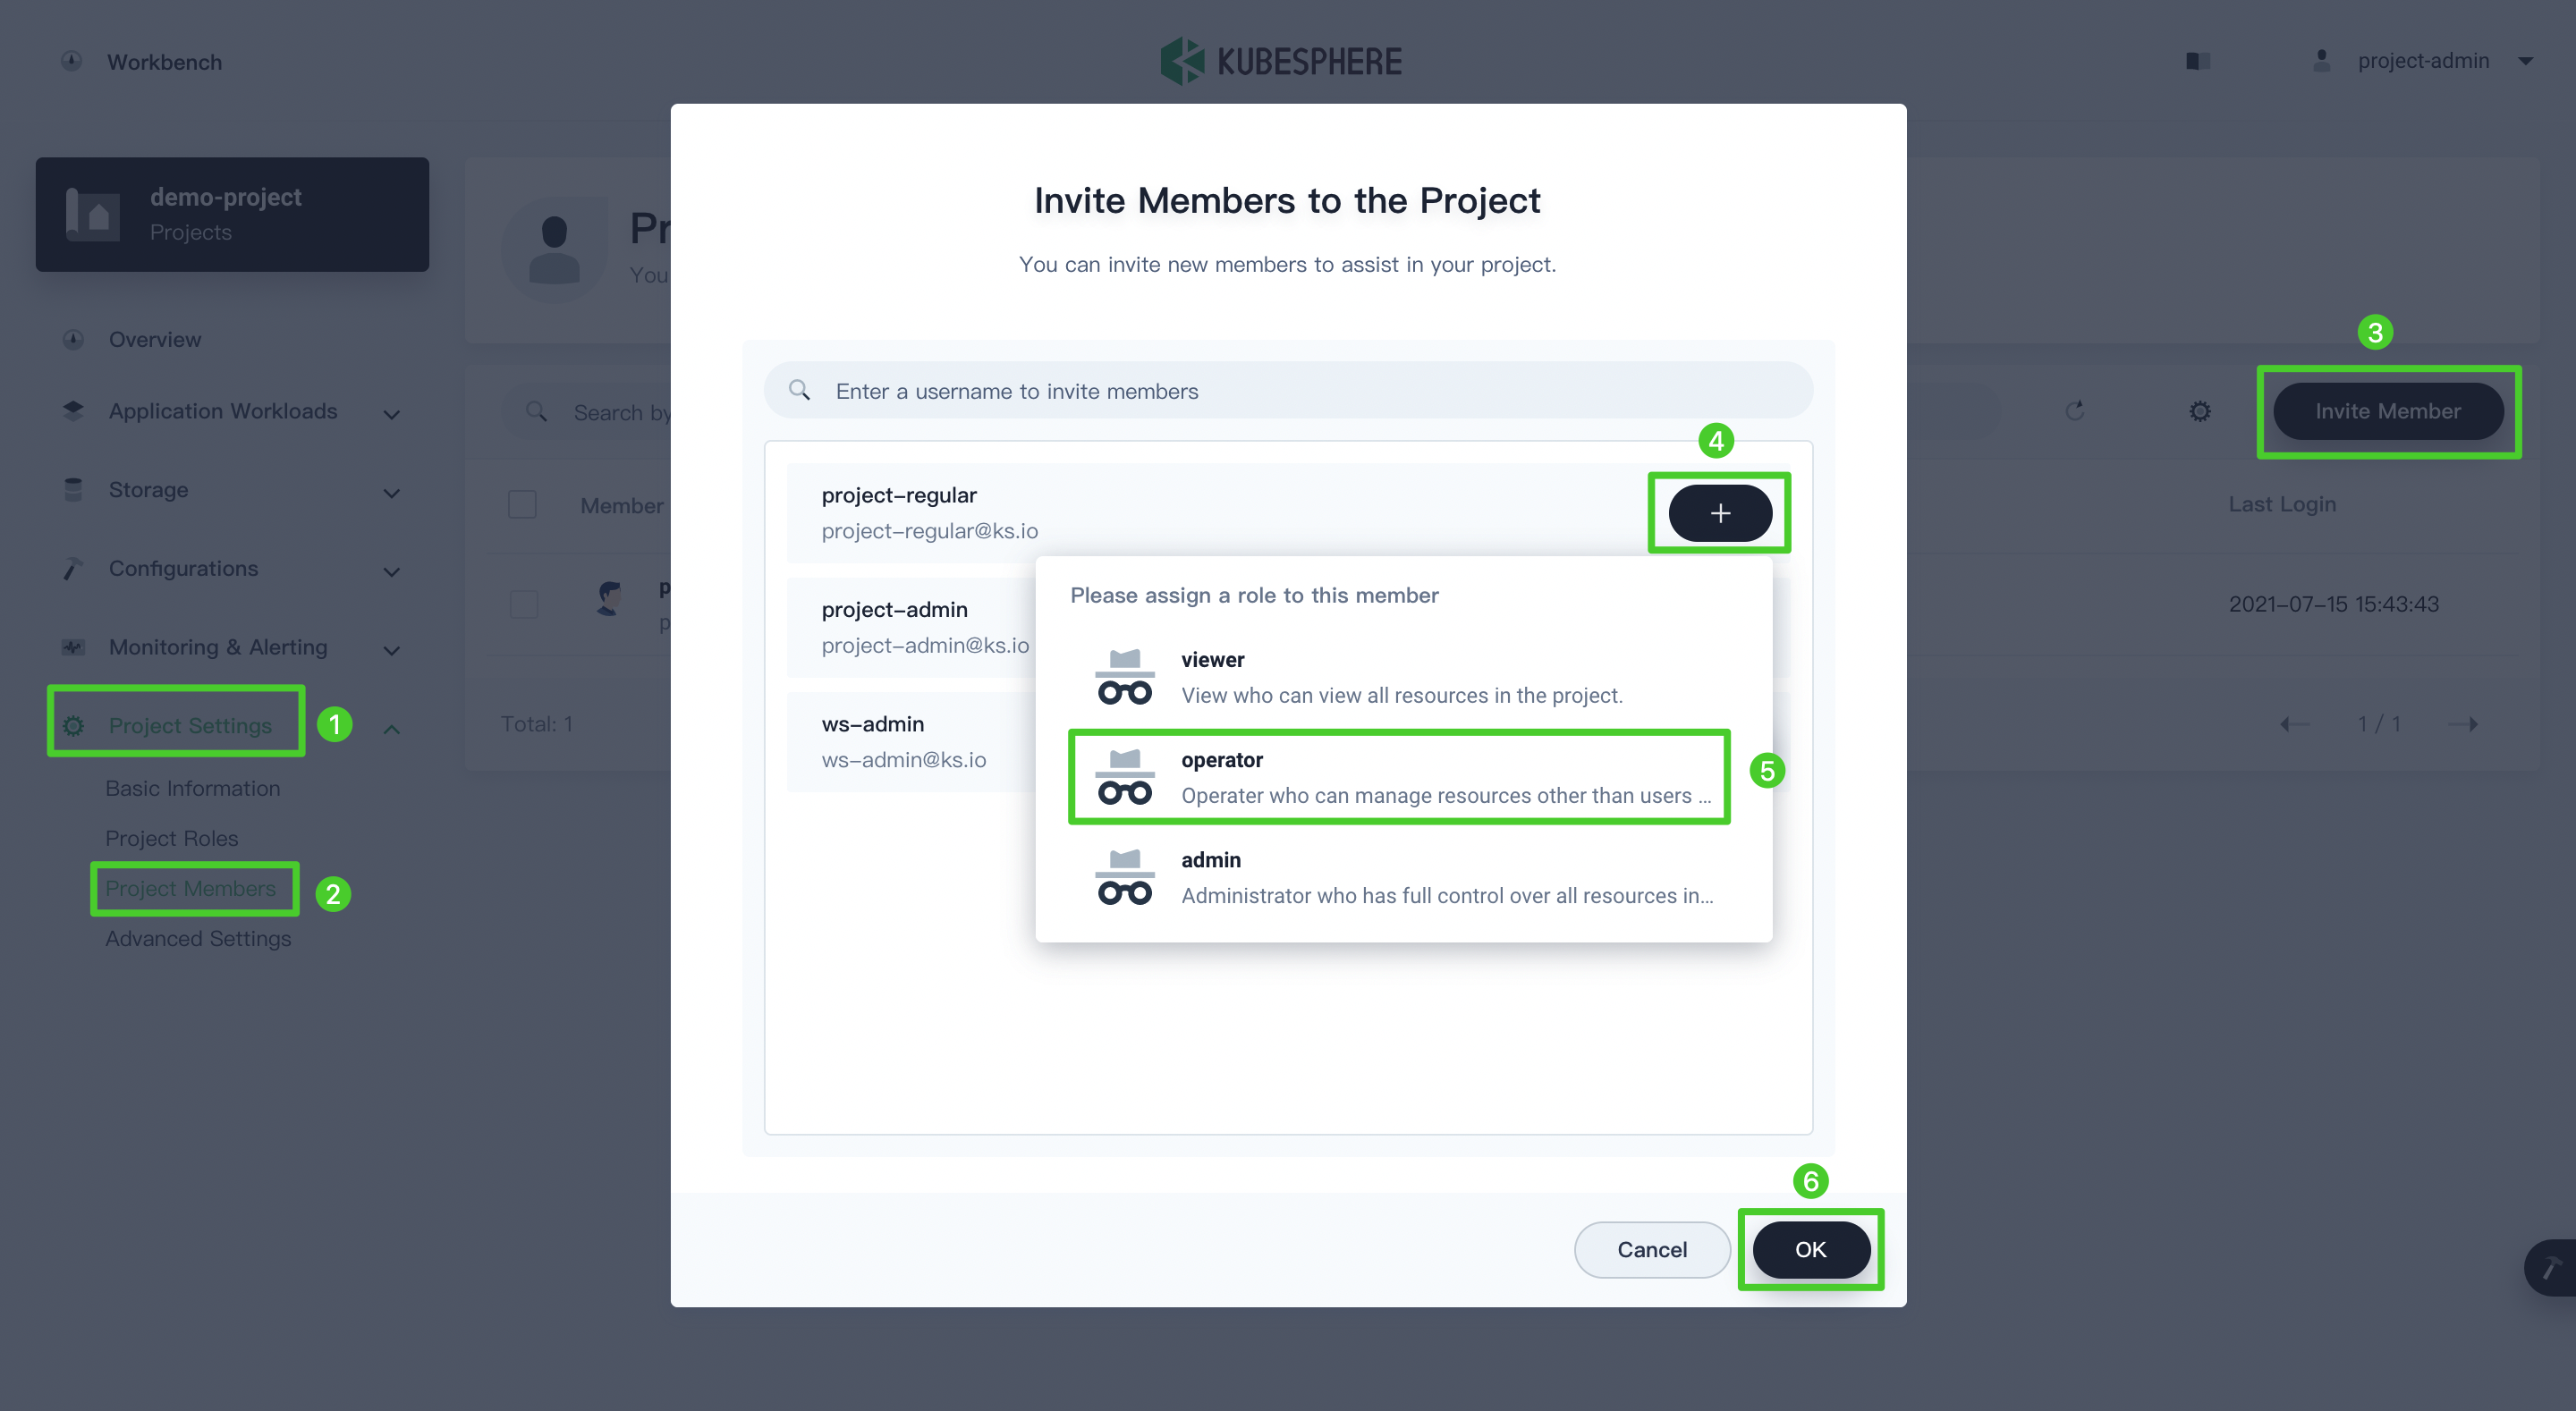
Info
The user granted the roleoperatoris a project maintainer who can manage resources other than users and roles in the project. -
Before creating a Route which is Ingress in Kubernetes, you need to enable a gateway for this project. The gateway is an NGINX Ingress controller running in the project. To set a gateway, go to Advanced Settings in Project Settings and click Set Gateway. The account
project-adminis still used in this step. -
Select the access method NodePort and click Save.
-
Under Internet Access, you can obtain the Gateway Address and the NodePort of http and https in the list.
Note
If you want to expose services using the typeLoadBalancer, you need to use the LoadBalancer plugin of cloud providers. If your Kubernetes cluster is running in a bare metal environment, it is recommended that you use OpenELB as the LoadBalancer plugin.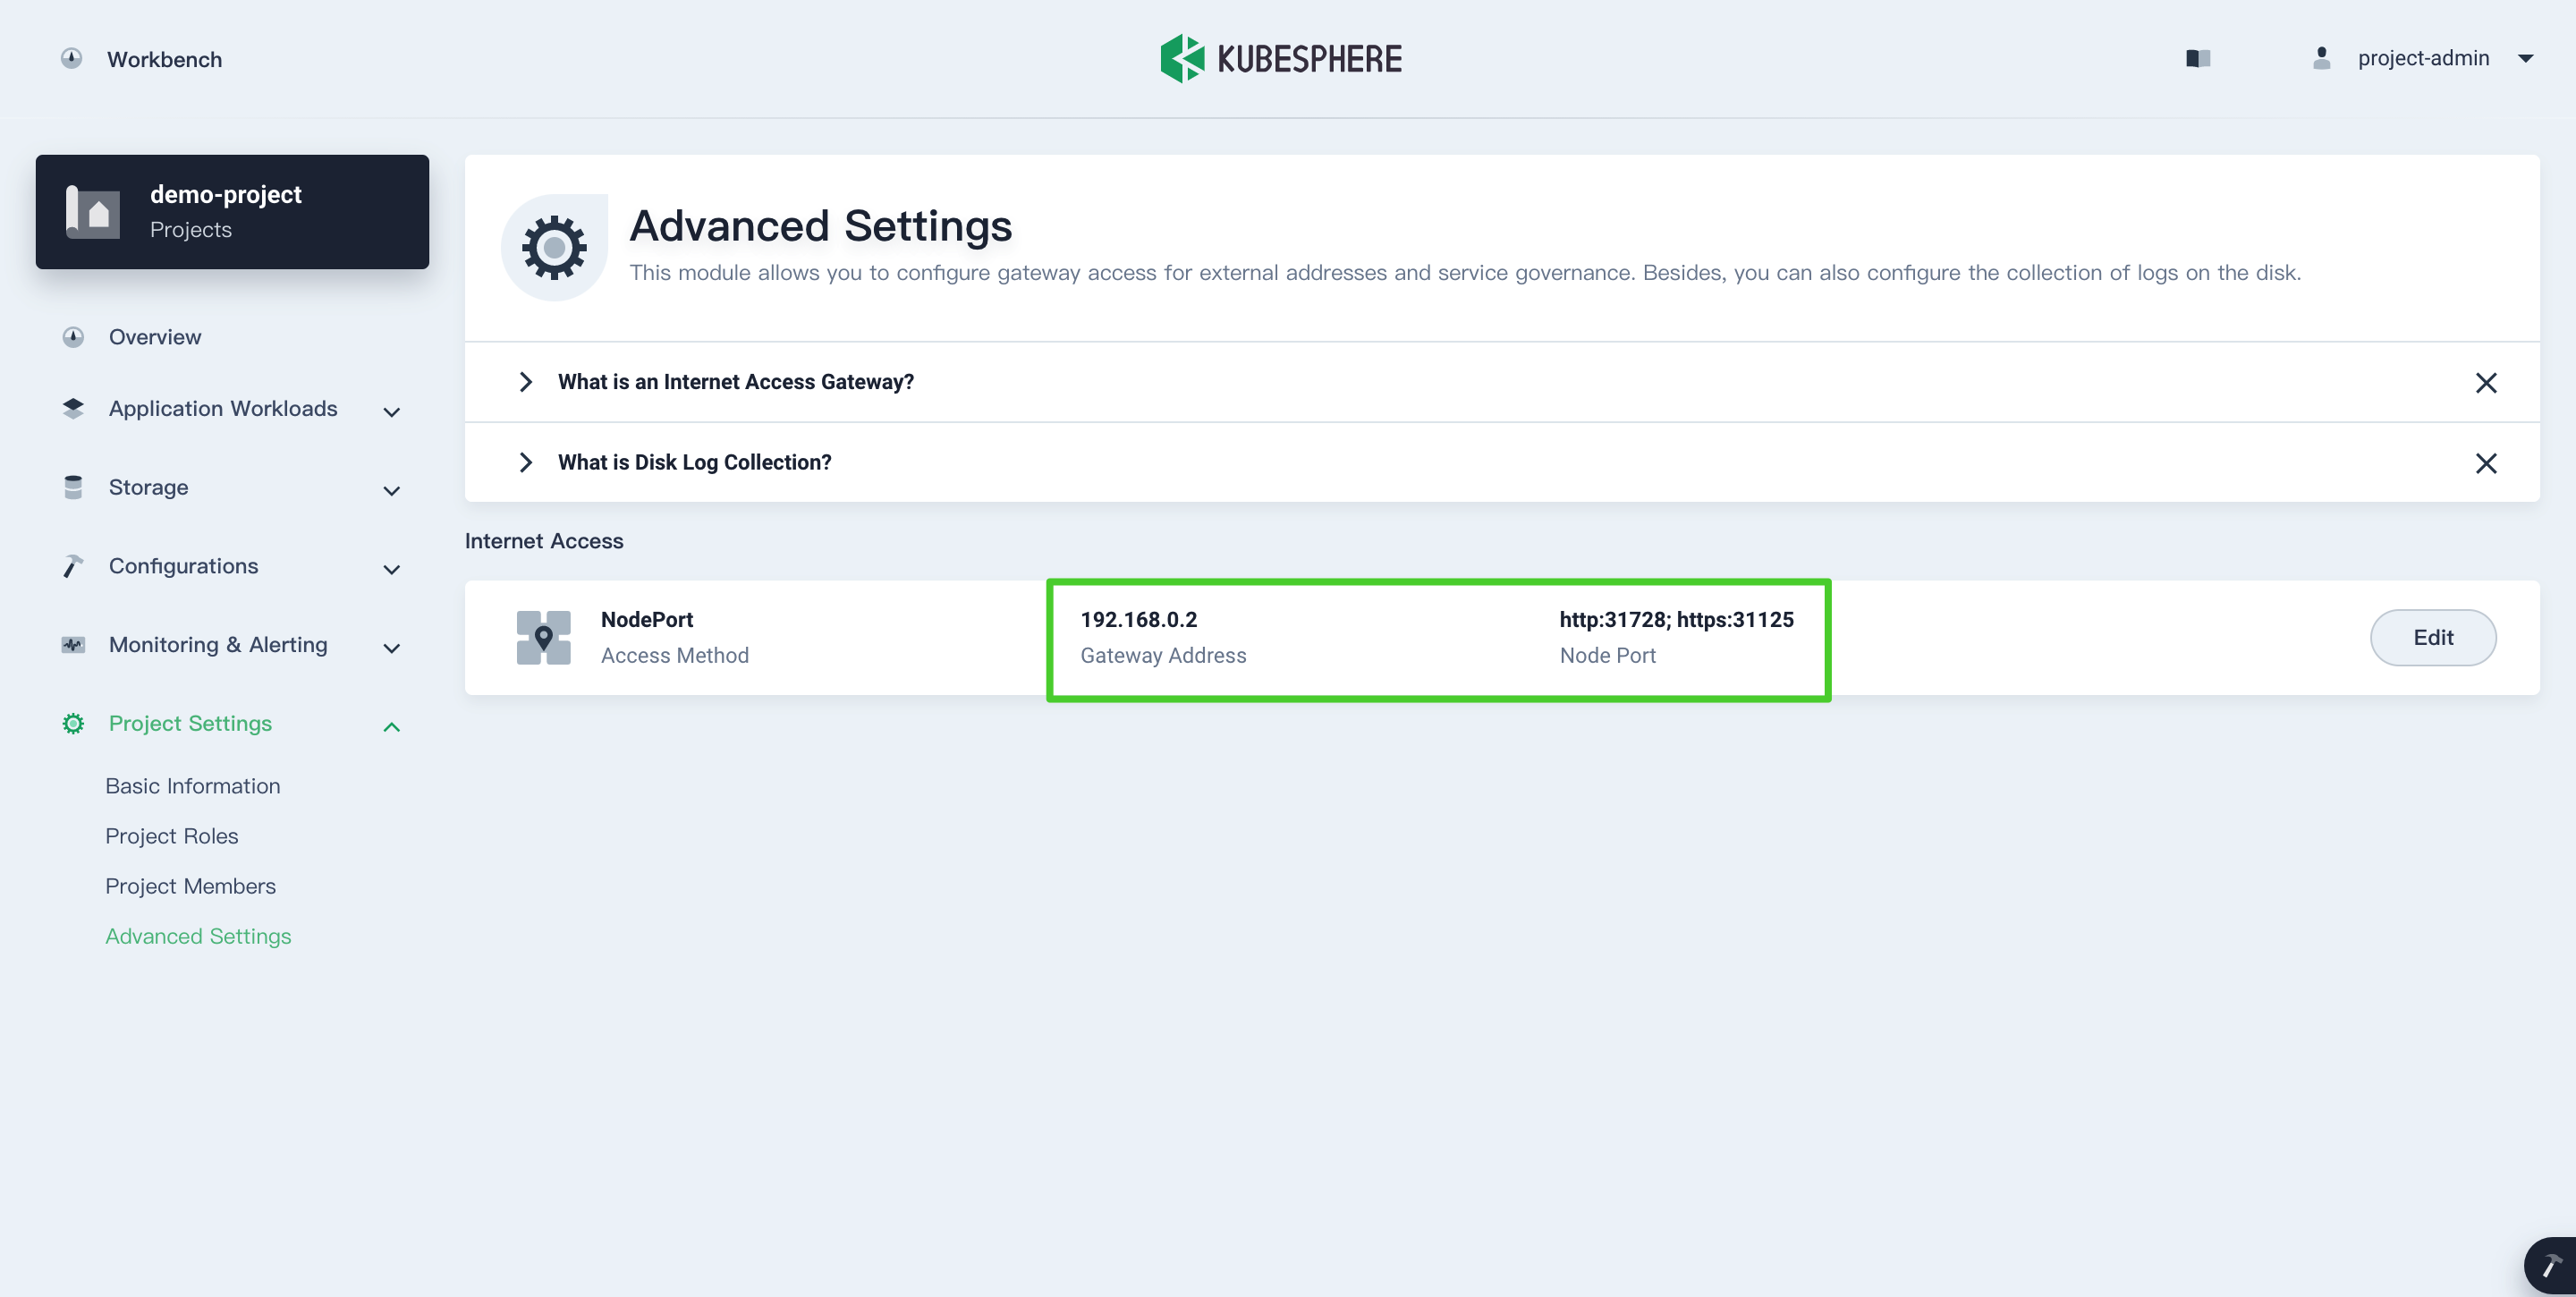
Step 4: Create a role
After you finish the above steps, you know that users can be granted different roles at different levels. The roles used in previous steps are all built-in ones created by KubeSphere. In this step, you will learn how to define a customized role to meet the needs in your work.
-
Log in to the KubeSphere web console as
adminagain and go to Access Control. -
Click Account Roles on the left navigation pane, and then click Create on the right.
Note
The preset roles on the Account Roles page cannot be edited and deleted. -
In the Create Account Role dialog box, set the name (for example,
clusters-admin), alias, and description of the role, and click Edit Permissions.Note
This example demonstrates how to create a role responsible for cluster management. -
In the Edit Permissions dialog box, set the role permissions (for example, select Cluster Management) and click OK.
Note
- In this example, the role
clusters-admincontains the permissions Cluster Management and Cluster Viewing. - Some permissions depend on other permissions. The dependency is specified by the Depends on field under each permission.
- When a permission is selected, the permission it depends on is automatically selected.
- To deselect a permission, you need to deselect its subordinate permissions first.
- In this example, the role
-
On the Account Roles page, you can click the name of the created role to view the role details and click
 to edit the role, edit the role permissions, or delete the role.
 -
On the Accounts page, you can assign the role to an account when you create an account or edit an existing account.
Step 5: Create a DevOps project (Optional)
Note
To create a DevOps project, you must install the KubeSphere DevOps system in advance, which is a pluggable component providing CI/CD pipelines, Binary-to-image, Source-to-image, and more. For more information about how to enable DevOps, see KubeSphere DevOps System.
-
Log in to the console as
project-admin. In DevOps Projects, click Create. -
Set a name for the DevOps project (for example,
demo-devops) and click OK. You can also add an alias and description for the project. -
Click the project name to view its details page.
-
Go to Project Management and select Project Members. Click Invite Member to grant
project-regularthe roleoperator, who is allowed to create pipelines and credentials. Click OK to finish.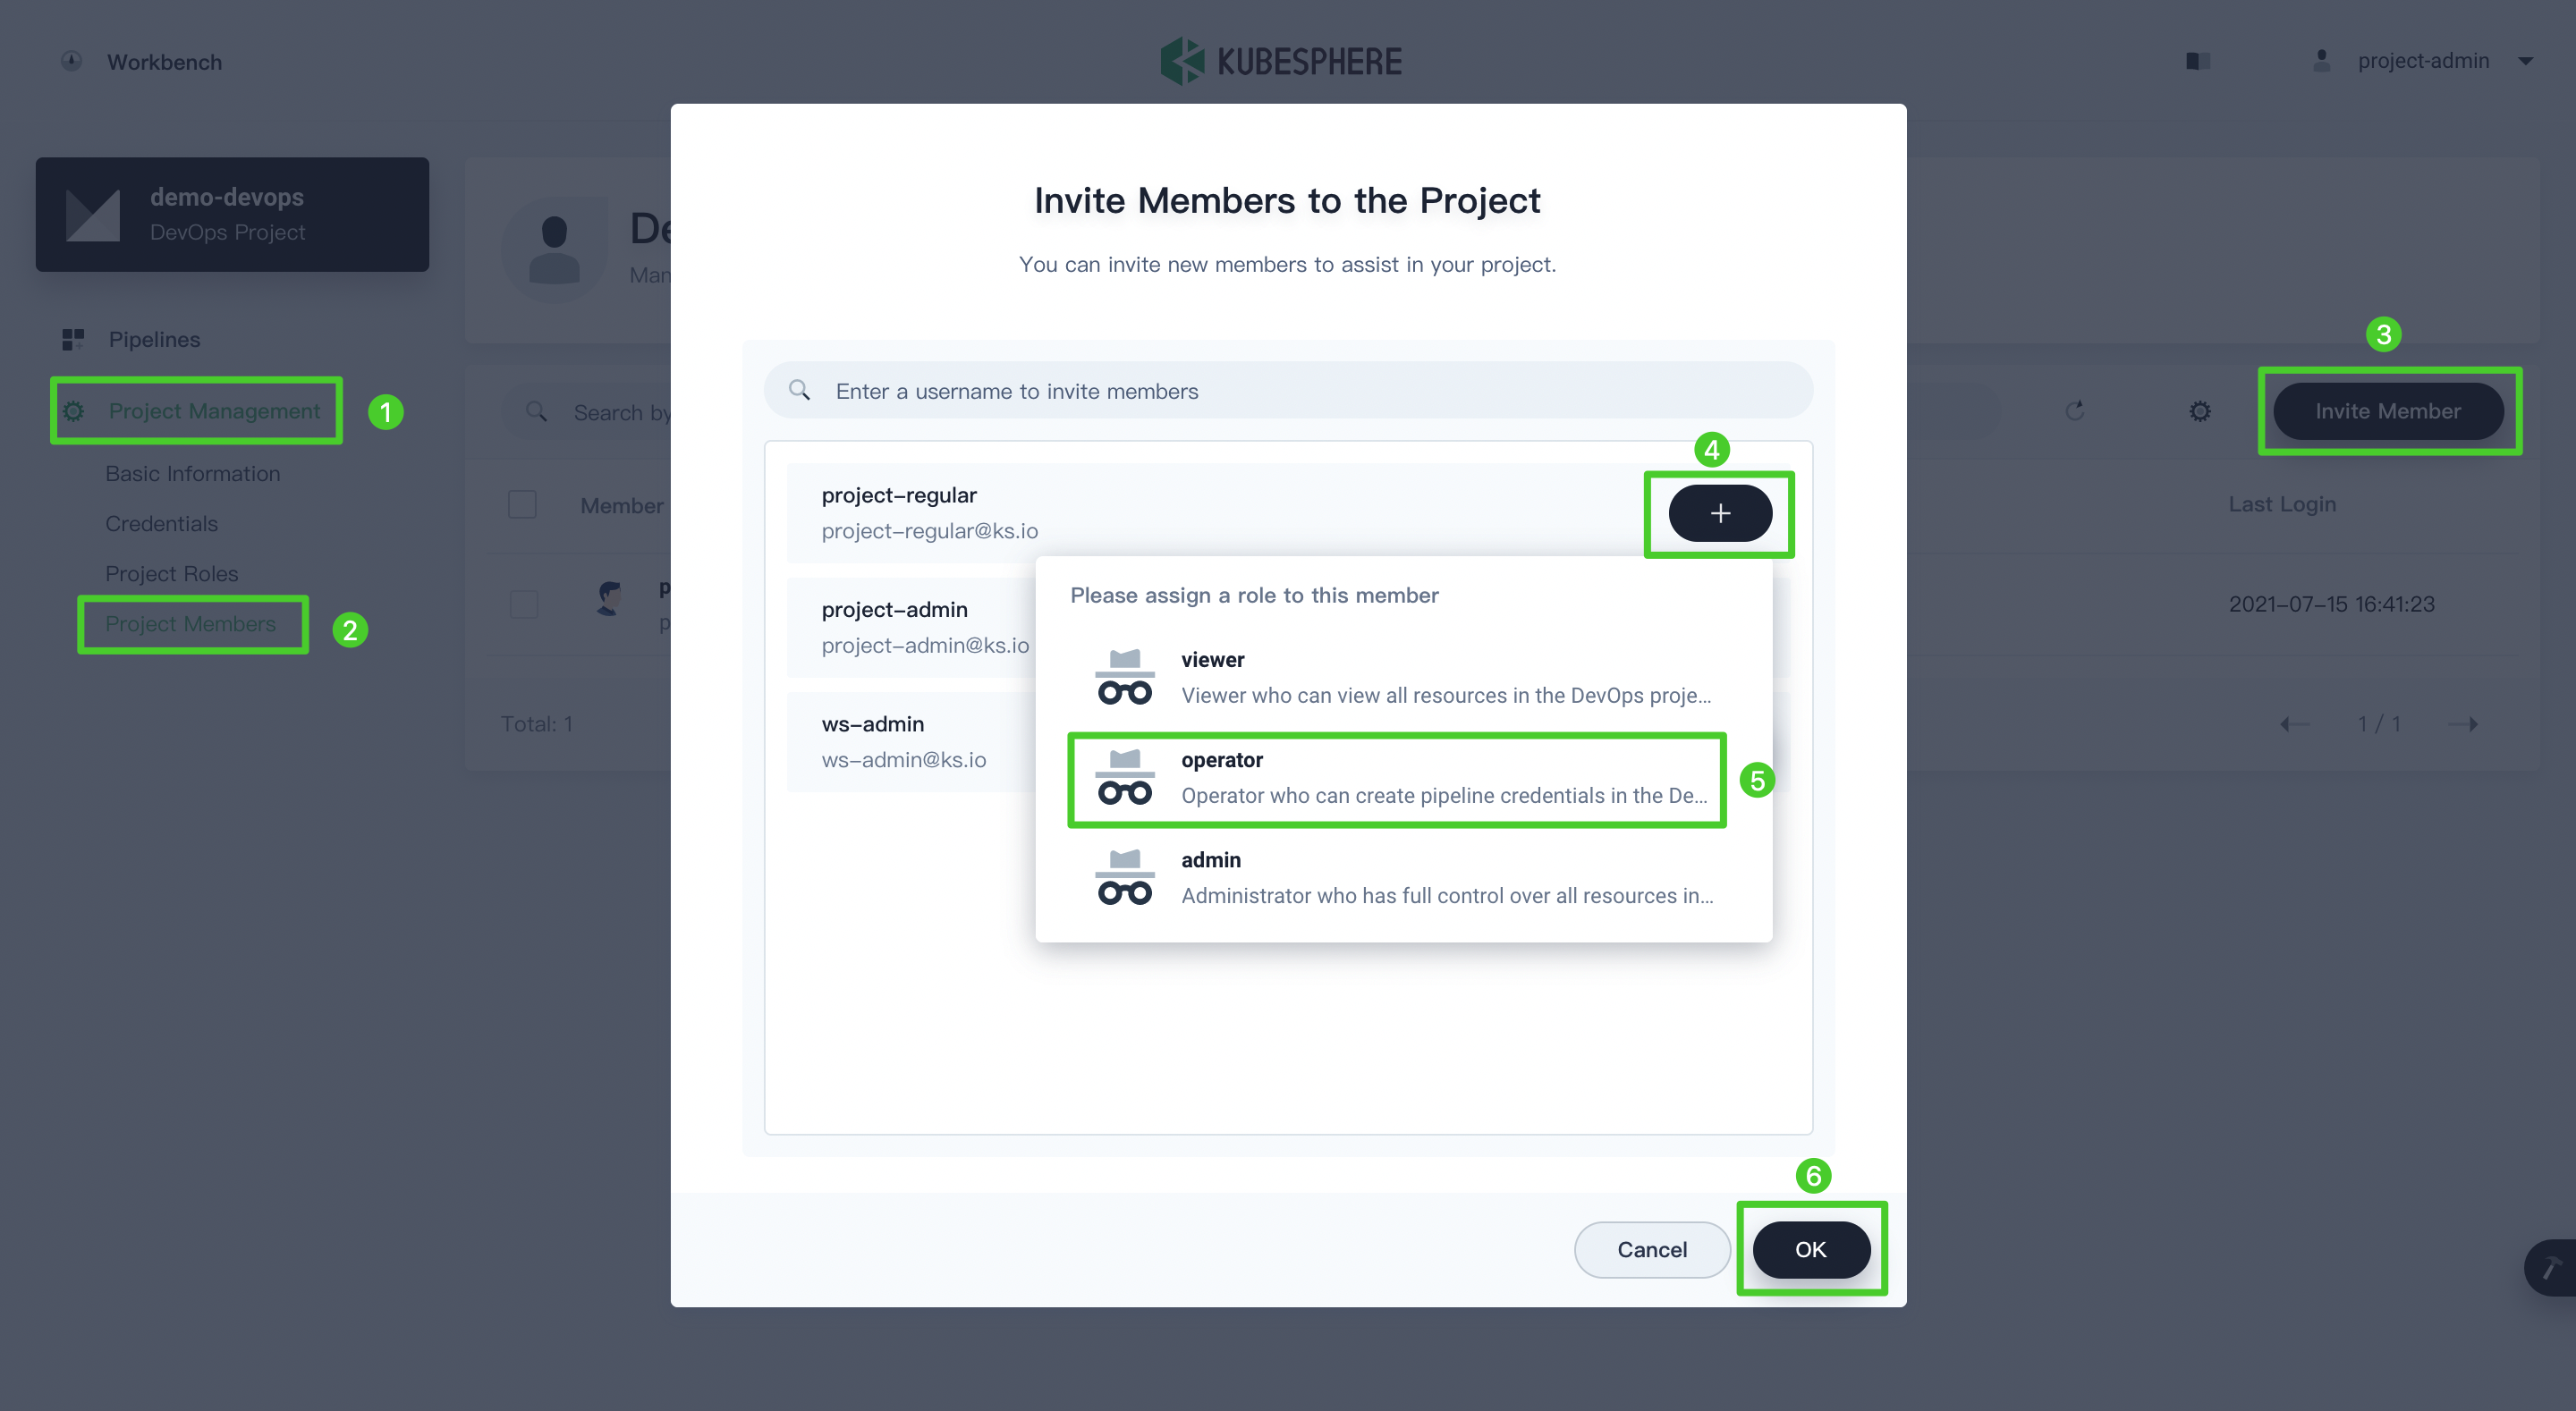
You are now familiar with the multi-tenant management system of KubeSphere. In other tutorials, the account project-regular will also be used to demonstrate how to create applications and resources in a project or DevOps project.
Feedback
Was this page Helpful?
 Previous

What’s on this Page